There are a total of 44 Lorestones in Hellblade: Senua’s Sacrifice. Collecting them all will unlock an achievement/trophy called “Stories From the North”. Lorestones can be easily missed at times, this guide will give you the location of all 44 Lorestones in Hellblade with a video below from HarryNinetyFour on Youtube.
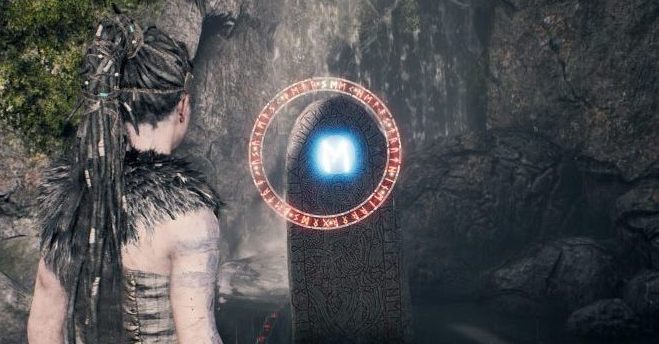
Lorestones are usually in fairly easy to find locations. If you look around the area, you will likely find them without too much effort. Some can be a little tricky to find since the stone itself doesn’t always look the same. When you get up close to a Lorestone, it is much easier to idenfify by the glowing pattern of characters that circle around the stone.

Each stone contains a character in the center. When you focus on the stone, you will have discovered the stone and the icon that was in the center will now turn blue/white. You will also notice that one of the red glyphs on the outer ring has also turned blue/white. This is a helpful way for you to know your progress. If you look closely you will see that there is a dot breaking up the outer ring into segments. This is there to signal the different areas of the game. If you have 3 in a row and there are 2 more red glyphs before reaching the dot, you know that there are 2 more Lorestones to find in this area. Be sore to hunt for them before triggering any major events in the area or it could result in you being locked out of an area and being unable to go back and get the stone.
Hellblade Lorestone Locations
Here is the location of all 44 Lorestones.
- Difficult to miss, the game will guide you view this one.
- Just after passing through the beach you will see the stone just below a waterfall next to the steps you must climb to proceed.
- After crossing a single beam high over the beach you just visited below, you will see the lorestone on your left before entering into the cave.
- After arriving at the gate to Hella and dying, you will be in a courtyard area. The stone is near the wall.
- VALRAVN BOSS – LEFT DOOR – After going through the door, proceed into the grassy area. Turn right and up a set of steps you will see the white circle on a post. Once you get closer you will see that this is a Lorestone with a sort of wonky H in the center.
- During the first illusion puzzle, you will need to find a way to the illusion gateway. When you get to the point where you can climb up the ladder, go back down and remove the bar from the locked metal door. Head back outside and go through the smaller illusion door and it will make a bridge appear. Head through the door you just opened and cross over the beam. The Lorestone will be on a wooden post at the other side with an M shaped glyph.
- You will arrive in an area with a stone circle with pillars around the edge and need to fight off a few enemies. Once the fight is over, progress around the edge of the circle and you will pass the stone on your way to the next area.
- In the next area you will be following a shallow stream/river. Follow it until you get to a wall and pass over a Valravn scarecrow. Turn right and you will find the stone on a post at the end of a trench.
- In the large puzzle area where there are multiple rune pieces hanging from the trees, make your way over to the illusion door on the right side from the perspective of the exit door. When you are inside the small fort area, you will see a small opening at the bottom of a wall. Go inside and the lorestone will be in here.
- SURTR BOSS – RIGHT DOOR – After completing the Valravn door, head through the door on the right. Walk forward through the wooded area at the start and about half way through you will come to a rock area. On the right is a small cave and the lorestone is inside.
- After getting to a bridge that has the door blocked on the far side, head down to the left to go the alternative route. When you get to the bottom of this path, the correct way to go is right, but the lorestone will be on the left.
- When you are searching for the first stone to burn through the gate, you will reach a round stone structure. The path to the left will bring you up to the top, the path to the right contains the lorestone.
- The second flame area contains a couple of broken down huts. Upon arriving in the area, walk to the right and go underneath the first broken down hut. The lorestone will be underneath the hut.
- At the final flame puzzle, you will be in an area that contains 2 huts with a bridge between them. You will start out in the hut on the right, so cross over to the other hut via the bridge in the middle and turn left. The stone is on a balcony at the end of this hut. Pass through gate and cross bridge
- After completing the fight against multiple enemies you will be able to progress through the door and continue on. Walk down the hall and go through the door to the right. The Lorestone is outside in the grass.
- Head up the stairs to a balcony that goes over the area you had the initial fight in. Walk around until you get to a window with a ladder on the outside. Climb down the ladder and you will find the stone behind you.
- When you get back out to the beach you will find this one near the water line on a large wooden beam sticking out from the sand.
- Directly after picking up 17,turn right and walk toward the face in the stone. Walk up the steps to the right and you will find the Lorestone on the right.
- Directly after 19, walk under the bridge and down the ladder on the other side. Run toward the boat on your right and behind the back, next to another boat you will find the Lorestone in the sand.
- Directly after 19, turn right and go into the cave straight ahead and on the left. Walk forward to the ruins of the boat and turn right. You will see a break in the wood up ahead. Follow this path until you get to boat that is on its side. The path will be leading left, but turn right and you will find the lorestone up near the end of the boat that is turned on its side.
- Progress until you reach a large tree on the beach. There will be bodies hanging from the tree and a blue glow in the center. Walk to the left of this tree and down near the shoreline you will find the Lorestone.
- Directly after 22, turn right and walk around the back of the large tree. You will find the Lorestone on a wooden plank just behind a rock after walking past the tree.
- On the beach at the labyrinth shard area, walk along the shoreline to the left and follow the path between the rocks. The stone is on a wooden plank at the end of this.
- This one is inside the torchlit castle structure. It is hard to describe this one since the place looks the same. See 14:24 in the video for more.
- This is just after 24. You will likely find it on your own, but check the video around 15:15 for the guide.
- This is also in the dark castle area. Check the video at 16:15 for the guide to find this one.
- In the Swap Shard area, you will see an illusion archway in front of you. Walk through it and walk back toward the large tower structure you passed. Take the path to the right of the tower and you will find the Lorestone to the left of another illusion archway at the end of the swamp path.
- Still in the swamp area, you will cross a small bridge that leads to a relatively large hut. Go inside and take a left. Mid way through the house is a doorway to the right that leads to the stone.
- In the tower shard area, after focussing on the large face, take a left and follow the path that leads you up to the building on the right. The lorestone is in the grassy area near the wall.
- After interacting with the next large face, walk straight ahead and through the open door next to the large gate. The lorestone is in the big warehouse area, right near the middle and do the right.
- Once you reach a large broken down tower area with cages hanging from the celing, you will see the first lorestone straight ahead on the bottom level of the tower.
- This one is on the floor directly above 31 and is very hard to miss.
- After interacting with the large face next to 32, head up the stairs and turn right just before the door to exit. The lorestone is on the wall on the left.
- Straight after 33, head back the way you came and cross over the beam to interact with the large face. Head back down the same path and out the doorway. Walk to the right and go back in the other open door. Follow the path all the way around in order to drop a bridge back down the face. Interact with the face again and head across that bridge. The lorestone is right outside on the balcony.
- Progress until you reach 2 large double doors together. It is impossible to miss this one as it is right on the other side of the second door, you will pass it as you progress.
- One you are in the dark caves, you will need to make your way between the patches of light before obtaining the torch. Once you have the torch head up the stairs. Rather than head through the door at the top, walk a little further to find a crack in the wall. Follow this up and the stone wil be at the end.
- Directly after 36, head back down the stairs you came up and head back out to the large cave where you first started and needed to run to the light. Since you have the torch, you are safe now. Turn left as you get into the larger cave area and against the wall on the left, mid way down the cave.
- Continue on through this area and you will reach a point where you need to cross over a narrow beam that goes over a large hole (Tomy Raider style) down the cave below where you first started. Cross over this and take a right into a prison cage kind of thing, the stone is inside here.
- Turn back out of where you found 38. and head down the correct path. You will get to a large gate with a red glyph that is an M shape. The stone will be on the wall to the left just before this gate.
- Later on you will reach a large double door with a large circular metal disc in the middle of it. Open this door and head down to the very end of the path. The Lorestone will be here.
- This is another one that is inside a castle like structure that is difficult to explain. It is a difficult one to miss since it is right at the bottom of a set of steps that you will travel up. Check the video out at 24:30 for the guide on how to get to it.
- When you reach a large bridge with big black chains holding it up, go backward into the building behind it and take the door on the left.
- Check the video around 25:30 for more as this is a tricky one too. It will be inside another jail cell like structure.
- The final Lorestone in Hellblade is found at the very top of a tower. The video will show you better at around 26:00.


