
Recording gameplay on the PlayStation 5 (PS5) is a straightforward process, allowing you to capture your favorite gaming moments to share with friends or on social media. The PS5 comes with built-in recording and streaming capabilities, eliminating the need for external capture devices for basic recording tasks. Here’s a detailed guide to get you started:
Table Of Contents
Preparing Your PS5 for Recording
- Adjust Capture Settings: Before you start recording, it’s a good idea to customize your capture settings.
- Go to Settings > Captures and Broadcasts.
- Under Captures, you’ll find options for Video Clip Format (resolution and file type), Length of Recent Gameplay to save, and whether to include your microphone’s audio and party audio.
- Storage Space: Ensure you have enough space on your PS5’s internal storage or an external USB drive formatted for use with the PS5. Captured videos can quickly take up space, especially at higher resolutions.
Recording Gameplay
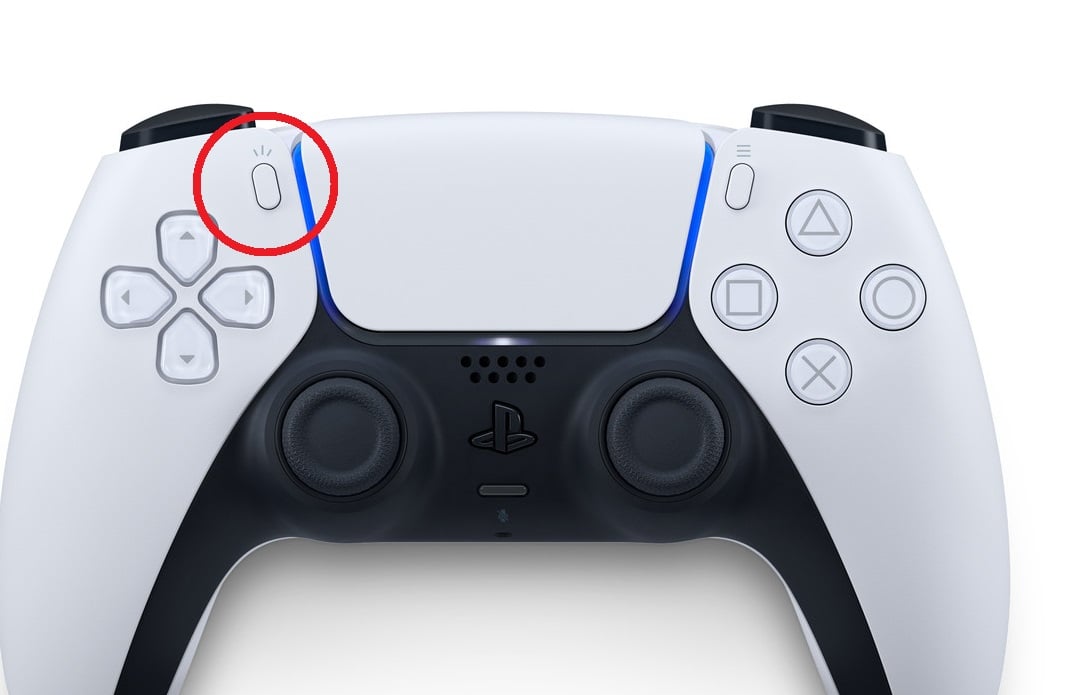
Using the Create Button
The PS5 controller features a “Create” button (left of the touchpad) that provides quick access to capture and broadcasting features.
- Start Recording Manually:
- Press the Create button to open the create menu.
- Select Start New Recording or press the square button to begin recording immediately.
- To stop recording, press the Create button again and select Stop Recording or press the square button.
- Save Recent Gameplay:
- If you didn’t start a manual recording but want to save recent gameplay, press the Create button.
- Choose Save Recent Gameplay > Short Clip (last 15 to 30 seconds) or Full Video (up to the last hour, depending on your settings).
Adjusting Recording Length
You can adjust the default length for recent gameplay captures in the capture settings, choosing anywhere from 15 seconds to an hour of footage to be saved when you select “Save Recent Gameplay.”
After Recording
- Viewing Your Clips: To view your captured videos, go to the Media Gallery from the PS5’s main menu. Here, you can watch, edit, or delete your clips.
- Editing Clips: The PS5 includes basic editing tools to trim your clips or combine them before sharing. Access these tools directly within the Media Gallery.
- Sharing Your Clips: Share your gameplay directly from the Media Gallery to linked social media accounts or copy them to a USB drive for more complex editing on a PC.
- To share, select a clip, press the Share button, and choose your preferred platform.
- To copy to a USB drive, plug the drive into your PS5, select a clip, press the Options button, and choose “Copy to USB Drive.”
Tips for Better Recordings
- Adjusting Capture Quality: Higher resolution recordings offer better quality but take up more space. Consider your storage options and the importance of video quality for your needs.
- External Microphone: For better audio quality, especially if you’re including commentary, consider using an external microphone connected to your PS5.
- Lighting and Background Noise: If you’re including camera footage or commentary, pay attention to your environment’s lighting and background noise for a better viewing experience.
Recording gameplay on the PS5 is designed to be user-friendly, allowing gamers of all levels to capture and share their gaming moments with minimal hassle. Whether you’re looking to share a tutorial, a breathtaking in-game event, or a funny glitch, these steps should help you get started with recording on your PS5.


