
One of the greatest features introduced by the PlayStation 4 is the ability to record gameplay footage and take screenshots without needing to purchase a video capture device. The PS4 has everything you need to record gameplay built right into it!
There are a few limitations to the system, but generally speaking, the features for recording gameplay footage with the PlayStation 4 is absolutely fantastic and incredibly useful for anyone looking to get started on YouTube or Twitch. Maybe you just want to make some game guides. This guide will explain everything you need to know to get started.
Table Of Contents
- Accessing The PS4 Share Menu
- Recording Gameplay With The PS4
- Recording PSVR gameplay
- How To Take A Screenshot With The PS4
- How To Stream Gameplay On The PS4
- Can You Stream To Multiple Services At Once?
- Changing the capture buttons on the Dualshock 4
- Recording Gameplay On PlayStation 4 Frequently Asked Questions
The share menu on the PS4 is something new that we have not seen on previous consoles. This menu will allow you to perform various actions related to the systems built-in game recording software.
Assuming you have not modified the controls, all you need to do is press the share button on the Dualshock 4 controller in order to load up the share menu. Make sure you press it and let go once you feel the click. Holding it down will perform a different action. Once here, you will be able to interact with all of the features offered in this menu which I will cover in the sections below.
The share button is something new that we have not seen on any of the past Dualshock controllers. If you look at the position of the “Select” button on this controller, you will see that it is no longer the select button. Instead, it is now the Share button. This is the button you will use to do everything related to sharing gameplay on the Playstation 4. Check out the image below for the exact location of the share button on the PS4 controller.
Recording Gameplay With The PS4
Recording gameplay with the PS4 couldn’t be any easier. In fact, the PS4 actually records your gameplay without you even asking it to. When you start up a game, the PS4 will automatically record the gameplay. It will default to 15 minutes, but you can increase this from the settings menu to record up to 1 hour of gameplay. If you end up doing something awesome and think “I wish I recorded this”, you are in luck! The PS4 did record it.
If you hold down the Share button to access the share menu, you will be able to press Square in order to save the gameplay clip that the console has been recording for you. Never again will you miss an awesome moment.
If you want to record a specific moment that you control, you can also trigger a recording session that starts as soon as you issue the command and stops when you tell it to.
To record gameplay with the PS4, double press the share button on the controller. You will see an icon appear on the screen with a red circle inside it to signal that the system is now recording the footage for you. The recording will keep going until it hits the max recording time, which you can set in the settings menu or when you specifically tell it to stop recording.
How do you stop recording gameplay?
Might seem like a simple thing, but this is a good question and one that is often asked by people who are new to the system. To stop the recording, all you need to do is double-tap the share button again. You will see an icon appear on the screen to let you know that it is no longer recording the footage.
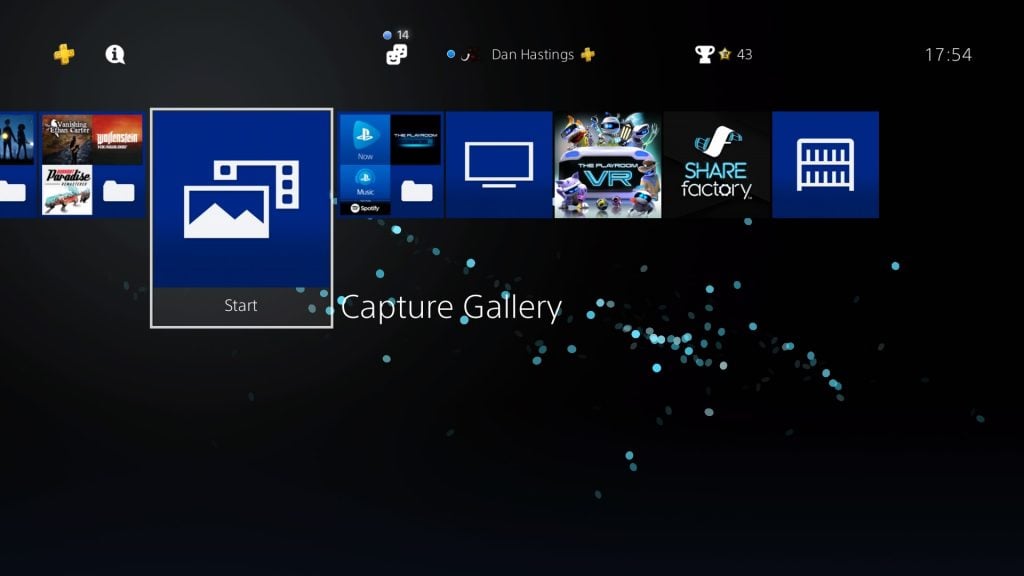
Where Can I Find Gameplay Recordings?
Another good question! Recorded gameplay footage is found in the capture gallery. You can find this on the main menu of the PlayStation 4. Once you open this, you will find a list of games that you have video recordings or screenshots for. Click into the game you want and you will see the list of content. You can view it from here and even share it online!

Recording PSVR gameplay
Recording PSVR gameplay is no different from recording regular gameplay. If you are using the PS Move controllers, you might find that a share button does not exist. These controllers were built for the PS3 and as a result, it has a start and select button.
If you look on the left side of the PS Move controller, you will see there is a button called “Select” this button behaves the exact same way as the share button does. Double click it and it will start recording gameplay of the PSVR game that you are playing. Double click it again to stop.
How To Take A Screenshot With The PS4
Taking a screenshot is also incredibly simple. You just need to hold down the share button and it will take a picture of the current screen you are looking at. You can also configure the system to automatically take a screenshot every time you unlock a trophy. Since some of these moments can be awesome, they can be great moments to capture.
Screenshots can be found in the capture gallery along with videos for all of the games that you have played.
How To Stream Gameplay On The PS4
Streaming gameplay is very simple on the PS4. Streaming is started through the share menu. In order to use it, you will first need to link the PlayStation 4 up with a streaming network such as Twitch or YouTube. The setup wizard will guide you through this process. So long as you remember the password and username for the account, you won’t have any issue getting connected.
From the share menu, click on the option to start broadcasting and it will present the different services you can stream to. Select one and you can enter some information that will appear on your streaming channel. Once you finish, you will start streaming right away!
Can You Stream To Multiple Services At Once?
This is something that a lot of people want and is, unfortunately, something that you can not do on the PS4. If you want to stream to multiple services at once, you will need to use something like Restreamer in order to achieve this.
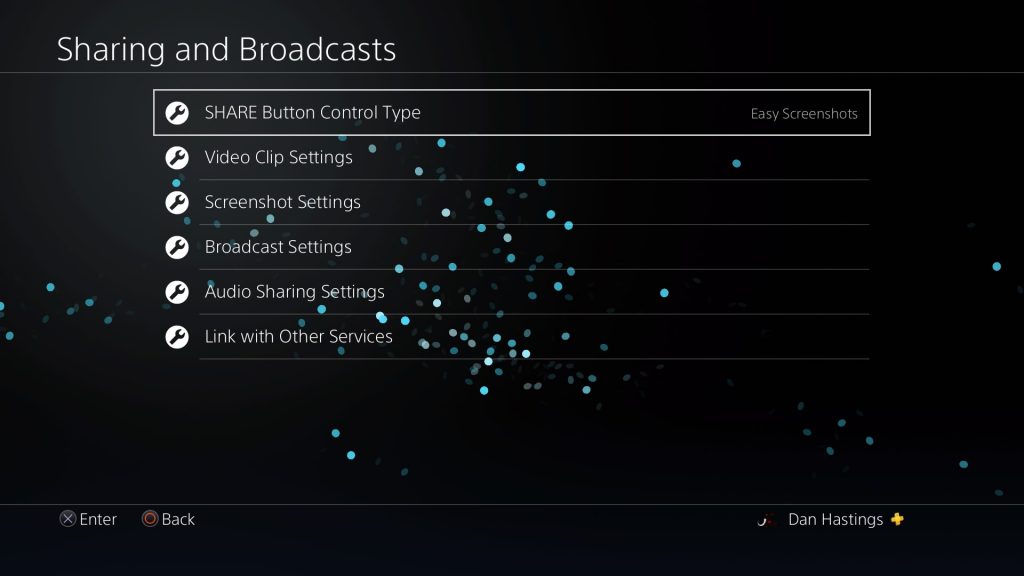
If you do not like the current layout of the buttons to take screenshots, record video and to access the PS4 Share menu, you can actually remap them very easily. If you are using default controls, hold down the “Share” button on the PS4 controller.
Recording Gameplay On PlayStation 4 Frequently Asked Questions
If you are getting started with gameplay recording on the PlayStation 4 and the information above was not helpful, check out some of the frequently asked questions below. If you still have questions you want to ask, feel free to ask a question in the hardware help section.
How to record previous gameplay on PS4?
The PS4 will automatically record previous footage. As soon as you start gaming, the recording will begin. To save this recording all you need to do is press the share button to access the share menu. From here, press Square and it will allow you to save the video. This will save the footage to the disk.
How To Record Gameplay For Longer?
By default, the gameplay recording time is limited. You can easily modify this from the settings menu though. If you access the share menu and go to settings, you will see that you can modify the time that a recording will run for before stopping. If this still isn’t enough, you can easily double click the share button to start recording again as soon as the recording automatically ends.
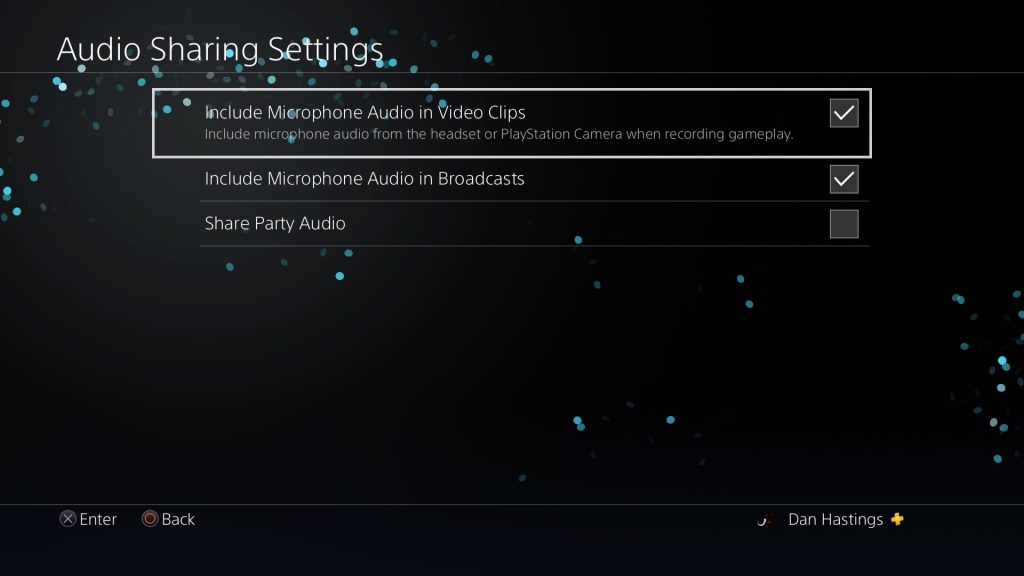
How to record gameplay on PS4 with voice?
By default, voice chat from your headset will not be included with video recordings you make with the PS4s DVR. It can be done very easily though. Access the share menu and go into the settings menu. From this menu, you will see that it is possible to check a box to allow for voice chat to be recorded.
How to transfer PS4 clips to PC?
To transfer clips to the PC or laptop, you will need to have a USB stick. Connect the USB stick to the PlayStation 4 and go to the capture gallery from the PS4 main menu. Find the video clip that you want and press the start button. This will bring up a menu. You will see that there is an option to copy to USB. Select this option and it will allow you to select videos and screenshots to copy to a USB stick. You can then use this USB stick with a Pc or laptop to access the videos here.


